SiteTrax.io API
The SiteTrax.io API enables seamless video processing for supply chain asset tracking by integrating with the SiteTrax backend primarily through data storage services such as Amazon S3 buckets. The API facilitates video uploads, typically captured using the SiteTrax.io Android app or other compatible cameras, to a specified data storage platform such as an Amazon S3 bucket for analysis. After uploading, SiteTrax.io processes the video and delivers the data to any REST API server, allowing for easy integration with other systems.Key features include: Video Upload: Videos up to 1 minute in length are uploaded to the designated data store, following specific guidelines such as a 1920x1080 resolution, 30 FPS, and embedded GPS data in subtitles. Processing and Output: Once uploaded, the SiteTrax.io backend analyzes the video and pushes the extracted data to any REST API compatible server. The processing time depends on the number of assets in the video. Camera Types: The API supports data capture from various camera types, including mobile apps and stationary cameras, with options for both dynamic and static GPS coordinates. The SiteTrax.io API simplifies the process of video uploading and analysis, enabling efficient asset tracking and data integration.
- SiteTrax.io API - Input (Video)
- SiteTrax.io API - Output (JSON)
- Test Development Environment - Setup SiteTrax.io Test API and JSON
SiteTrax.io API - Input (Video)
Getting Started
The SiteTrax.io backend requires a centralized data storage to transfer data to and from it. Currently, Amazon AWS S3 buckets are supported as the recommended data store. If needed, the bucket information and access keys can be provided by SiteTrax.io or your organization is welcome to set up their own S3 buckets. Please submit a support ticket to request a bucket and access keys to process videos.
For instructions on setting up a test environment, please see the Test Development Environment - Setup SiteTrax Test API and JSON article.
Overview
The SiteTrax.io backend analyzes video stored in an Amazon S3 bucket and outputs that data to any REST API server.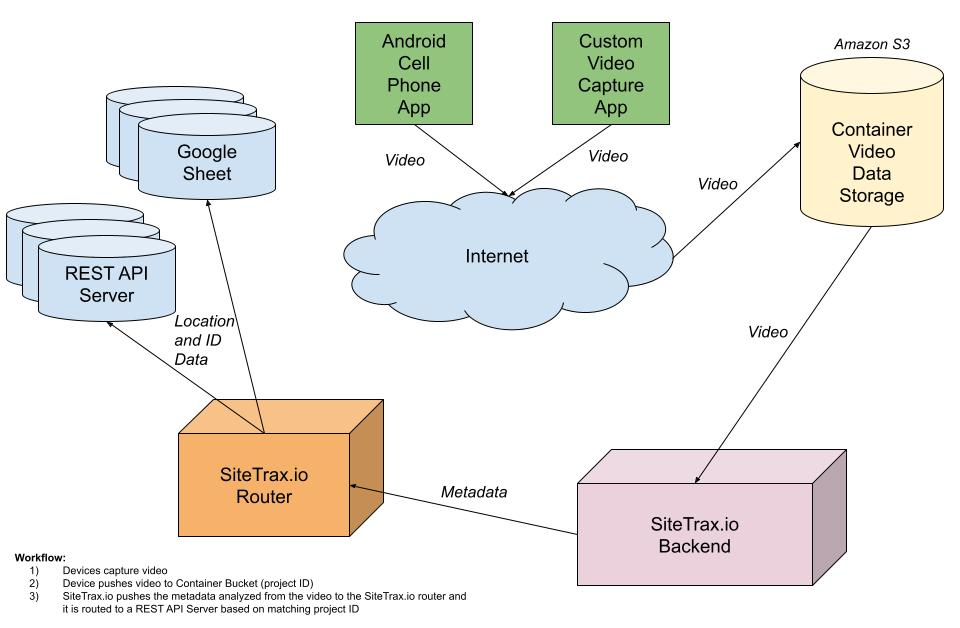
Reference: https://docs.google.com/drawings/d/1ZwDE18DMtbIDPIujX_M61jRm2SvanIolZJ7RsnY4XW0/edit
Step #1: Upload Video (Push) - See Input - Video Specifications below for more details
- Option #1: Using the SiteTrax.io Android app, capture video using any mode, which will upload capture and upload the video automatically for you into a storage bucket.
- Option #2: Upload video (no more than 1 minute in length) to the Amazon S3 bucket provided.
Step #2: REST API Server (Push)
After the video is uploaded in Step #1 above, the SiteTrax.io Backend will analyze the video and push the data analyzed to any REST API server via the SiteTrax.io Router. See Output - REST API page more information.
NOTE: Make sure to request API Server access via the link in the Overview section above.
Input - Video Specifications
The files that should be uploaded in {bucket_name}/notprocessed folder. The maximum recommended length of a video is 1 minute.
- Video length: If the video is more than 1 minute in length, it is recommended to split the video into multiple 1 minute videos.
- The recommended resolution of video is 1920x1080 with a frame rate of 30 frames per second.
- The lens of 6mm or longer should be used. A lens less than 5mm could cause distortion and the backend may not be able to read the OCR.
- The GPS information should be embedded in the subtitles of the video (this can be overwritten for static cameras)
SiteTrax.io Camera Types
SiteTrax.io can capture data from many different types of cameras including Android and basic security cameras. For implementation purposes, we recommend:
- SiteTrax.io Mobile app (i.e. Android) - Many cameras for one bucket. The GPS coordinates are dynamically sent base on the location of the mobile app.
- SiteTrax.io Gate or stationary camera - One camera to data store. The GPS coordinates have to be manually defined for each camera.
GPS Encoding
Below is an example of embedded subtitles in SRT format.
1 00:00:00,000 --> 00:00:00,150 36.8626459 -76.2314164 2 00:00:00,150 --> 00:00:00,300 36.8626459 -76.2314164 3 00:00:00,300 --> 00:00:00,450 36.8626459 -76.2314164 . . .
Video creation time should be present in both video stream and subtitle stream. In addition to this, creation time should also be present in file metadata. Video should be in mp4 format only. Below in an example of metadata as ffmpeg output.
Input #0, mov,mp4,m4a,3gp,3g2,mj2, from '2_20211018T042608717Z_s00.mp4':
Metadata:
major_brand : isom
minor_version : 512
compatible_brands: isomiso2avc1mp41
creation_time : 2021-10-18T16:26:08.000000Z
encoder : Lavf58.67.100
Duration: 00:00:14.55, start: 0.000000, bitrate: 29921 kb/s
Stream #0:0(eng): Video: h264 (Baseline) (avc1 / 0x31637661), yuvj420p(pc, smpte170m/bt470bg/smpte170m), 1920x1080, 33017 kb/s, SAR 1:1 DAR 16:9, 30.04 fps, 30 tbr, 90k tbn (default)
Metadata:
creation_time : 2021-10-18T16:26:08.000000Z
handler_name : VideoHandle
vendor_id : [0][0][0][0]
Side data:
displaymatrix: rotation of -90.00 degrees
Stream #0:1(und): Subtitle: mov_text (tx3g / 0x67337874), 1 kb/s (default)
Metadata:
creation_time : 2021-10-18T16:26:08.000000Z
handler_name : SubtitleHandler
Sample videos can be found here.
Video Upload
Once a video is generated, it can be uploaded to your designated bucket. Your SiteTrax.io representative will give you a URL specific to your project. A POST request with the json body below (replace <video_name> with the file name of the video you are uploading) will return a presigned URL to which the video should be uploaded. This URL will be active for 300 seconds.
{
"video": "<video_name.mp4>",
"method": "put_object"
}Once you have the presigned URL, uploading the video to the s3 bucket can be done by following these steps.
https://docs.aws.amazon.com/AmazonS3/latest/userguide/using-presigned-url.html
Note that this method can also be used to download a video that you have previously uploaded by changing the method to "get_object".
Once the video upload is complete, SiteTrax.io backend will start processing the video. The processing time is proportional to the number of trackable assets in the video.
If records from a video do not show up please check our status page or if all services are up then please file a support ticket at our support page.
SiteTrax.io API - Output (JSON)
The SiteTrax.io JSON API is a simple, JSON-backed push interface for sending SiteTrax.io captured geolocation and asset ID information to any REST API server. It is fully compatible with most REST API servers that accept JSON messages.
The JSON API is intended for software developers. To use it you should be familiar with web programming and be comfortable creating applications that consume web services through HTTP requests.
Getting Started
The SiteTrax.io backend requires an AWS bucket to be able to transfer data to and from it. The bucket information and access keys will be provided by SiteTrax. Please submit a support ticket to request a bucket and access keys to process videos.
For instructions on setting up a test environment, please see the Test Development Environment - Setup SiteTrax Test API and JSON article.
Overview
The SiteTrax.io backend analyzes video stored in an Amazon S3 bucket and outputs that data to any REST API server.
Reference: https://docs.google.com/drawings/d/1ZwDE18DMtbIDPIujX_M61jRm2SvanIolZJ7RsnY4XW0/edit
Step #1: Upload Video (Push) - See Input - Video Specifications below for more details
- Option #1: Using the SiteTrax.io Android app, capture video using any mode, which will upload capture and upload the video automatically for you into a storage bucket.
- Option #2: Upload video (no more than 1 minute in length) to the Amazon S3 bucket provided.
Step #2: REST API Server (Push)
After the video is uploaded in Step #1 above, the SiteTrax.io Backend will analyze the video and push the data analyzed to any REST API server via the SiteTrax.io Router. See Output - REST API section below for more information.
NOTE: Make sure to request API Server access via the link in the Overview section above.
Input - Video Specifications
The files that should be uploaded in {bucket_name}/notprocessed folder. The maximum recommended length of a video is 1 minute.
- Video length: If the video is more than 1 minute in length, it is recommended to split the video into multiple 1 minute videos.
- The recommended resolution of video is 1920x1080 with a frame rate of 30 frames per second.
- The lens of 6mm or longer should be used. A lens less than 5mm could cause distortion and the backend may not be able to read the OCR.
- The GPS information should be embedded in the subtitles of the video (this can be overwritten for static cameras)
SiteTrax.io Camera Types
SiteTrax.io can capture data from many different types of cameras including Android and basic security cameras. For implementation purposes, we recommend:
- Mobile App (i.e. Android) - Many cameras for one bucket. The GPS coordinates are dynamically sent base on the location of the mobile app.
- Stationary camera - One camera to one bucket. The GPS coordinates have to be manually defined for each camera.
Output - REST API
The orientation of output JSON is in records format. These records represent each detected asset and its metadata. These records of a single video are sent in series one after another. Samples of each type of record are given below.
International Intermodal Shipping Container ID
{
"video_name": "video24-05-07_09-43-03-39_01424",
"type": "International Intermodal Vertical ID",
"text": "TRBU5341840",
"datetime": "2024-05-07T13:43:43.701000Z",
"datetime_original": "2024-05-07T13:43:43.701000Z",
"datetime_digitized": "2024-05-07T13:43:43.701000Z",
"gps_lat": 30.4178413846,
"gps_lon": -81.5642421112,
"container_company": "CJ DARCL LOGISTICS LIMITED",
"container_country": "India",
"status": "Success",
"status_code": "A0",
"asset_image": "https://d11isnr6z7061v.cloudfront.net/video24-05-07_09-43-03-39_01424_TRBU5341840.jpg",
"asset_heading": "R2L",
"camera": "B8A44F9E3A9E",
"feedback": "https://service.sitetrax.io/feedback/ZWNlMmMyOTAtMWVlMi00NDQ2LTgyOGQtMTRiYzliODc4NGFiL1RSQlU1MzQxODQwLzg1MzI5MA"
}International Intermodal Shipping Container Chassis
{
"video_name": "6519_20230731T115236880Z_s00",
"type": "Mounted Chassis ID",
"text": "NEXQ422124",
"datetime": "2023-07-31T23:52:51.900000Z",
"datetime_original": "2023-07-31T23:52:36.000000Z",
"datetime_digitized": "2023-07-31T23:52:36.000000Z"
"gps_lat": 33.7994263,
"gps_lon": -118.2270262,
"container_company": "-",
"container_country": "-",
"status": "Could not find Asset ID in provided asset list.",
"status_Code": "I4",
"asset_image": "https://container-thumbnails-public.s3.amazonaws.com/6519_20230731T115236880Z_s00_NEXQ422124.jpg",
"asset_heading": "R2L",
"camera": "B8A44F9E3A9E",
"feedback": "https://service.sitetrax.io/feedback/YTM1MDhjOTYtZTY5Mi00ZTlkLWE3NTMtYTM2ZWUxNmNlNTliL05FWFE0MjIxMjQvNTE1OTg3"
}Shipping Container and Chassis
{
"video_name": "video24-05-07_09-43-03-39_01424",
"type": "International Intermodal Vertical ID",
"text": "TRBU5341840",
"datetime": "2024-05-07T13:43:43.701000Z",
"datetime_original": "2024-05-07T13:43:43.701000Z",
"datetime_digitized": "2024-05-07T13:43:43.701000Z",
"gps_lat": 30.4178413846,
"gps_lon": -81.5642421112,
"container_company": "CJ DARCL LOGISTICS LIMITED",
"container_country": "India",
"status": "Success",
"status_code": "A0",
"asset_image": "https://d11isnr6z7061v.cloudfront.net/video24-05-07_09-43-03-39_01424_TRBU5341840.jpg",
"asset_heading": "R2L",
"stacking": "314875212301145617478946594181356160171_000_000",
"camera": "B8A44F9E3A9E",
"feedback": "https://service.sitetrax.io/feedback/ZWNlMmMyOTAtMWVlMi00NDQ2LTgyOGQtMTRiYzliODc4NGFiL1RSQlU1MzQxODQwLzg1MzI5MA"
}Generic Text Asset Tracking
{
"video_name": "video24-05-07_09-43-03-39_01424",
"type": "Generic OCR",
"text": "TRBU5341840",
"datetime": "2024-05-07T13:43:43.701000Z",
"datetime_original": "2024-05-07T13:43:43.701000Z",
"datetime_digitized": "2024-05-07T13:43:43.701000Z",
"gps_lat": 30.4178413846,
"gps_lon": -81.5642421112,
"container_company": "CJ DARCL LOGISTICS LIMITED",
"container_country": "India",
"status": "Success",
"status_code": "A0",
"asset_image": "https://d11isnr6z7061v.cloudfront.net/video24-05-07_09-43-03-39_01424_TRBU5341840.jpg",
"asset_heading": "R2L",
"camera": "B8A44F9E3A9E",
"feedback": "https://service.sitetrax.io/feedback/ZWNlMmMyOTAtMWVlMi00NDQ2LTgyOGQtMTRiYzliODc4NGFiL1RSQlU1MzQxODQwLzg1MzI5MA"
}Each record has a variety of metadata to track and localize an asset across the globe. There are also status codes included in international intermodal shipping container records to represent how sure we are of each input container.
API Reference
| Field | Type | Description |
|---|---|---|
|
|
|
Name of the video in which container was detected. |
type |
str |
Type of detected asset ID. (Horizontal of Vertical) |
text |
str |
Detected asset ID. |
datetime |
str |
Time in ISO8601 of when the camera was passing in front of the asset. (This should be used as the timestamp for thirdparty applications) |
datetime_original |
str |
Time in ISO8601 of when the video was created. |
datetime_digitized |
str |
Time in ISO8601 of when the video was digitized. |
gps_lat |
float |
Latitude of detected asset in decimal format. |
gps_lon |
float |
Longitude of detected asset in decimal format. |
container_company |
str |
Company associated with the container. For more information please check BIC database. (International Intermodal Exclusive Entry) |
container_country |
str |
Country of the company. (International Intermodal Exclusive Entry) |
status |
str |
Verbal description of the container entry detection status. (International Intermodal Exclusive Entry) |
status_code |
str |
Return code associated with the status of the entry. (International Intermodal Exclusive Entry) |
asset_image |
str |
A public URL to the image of the asset that we are trying to track. |
asset_heading [optional*] |
str |
Specifies the asset direction within the camera frame. R2L: Asset moving from right to left. L2R: Asset moving from left to right. |
|
str | [Deprecated] [Replaced by below field] If more than one processing type is selected, this field is populated. Users can sort the records via this field to match assets that may pair together. |
|
str | For containers and chassis detection. This field pairs a container record with it's corresponding chassis record. |
|
str |
Unique serial number of the camera. Only available to virtual gate applications. |
| feedback [optional*] | str |
A unique URL specific to every record that can be used to give feedback and share the record with anyone. |
Status Codes (International Intermodal Exclusive)
| Code | Description |
|---|---|
| A0 | No errors were detected for the container entry. |
| A1 | Check digit of the entry is interpolated. |
| I1 | BIC repository cannot verify the company of the container. |
| I2 | Check digit of the container cannot be verified. A record containing this code can be classified as incorrect right away. |
| I3 | We detected the container but its ID cannot be determined. This can be due to damaged or scratched ID or the asset might not be a standard asset. |
| I4 | The provided database of assets does not contain the listed asset. |
| I5 | When processing for both container and chassis is selected, if there is no container for a chassis because it is a bare chassis then the entry for that missing container will have this status code. |
| I6 | Low confidence detection. |
| I7 | Low confidence detection. ID has been interpolated. |
The status code, status text, country and company are only available for international intermodal shipping container IDs. For chassis ID and generic text detection, these entries are not available.
Generating Test Sample Data
We recommend using SiteTrax.io directly to generate test data. This can be done by scanning a picture of an intermodal containers to trigger events whenever you wish. It is recommended to scan a complete container so that the object detection and first identify the container and then scan the ID.
Preparing test data to be pushed to you for testing:
- Locate an Android 10 or later device
- Register for a free SiteTrax.io account - https://www.sitetrax.io (Click Register)
- Download the SiteTrax.io Android app (link provided after registering your account above).
- Scan an international intermodal container and/or chassis.
- View the results in a Google Spreadsheet.
Next, use the one or more images of containers on a full screen computer and scan the ISO numbers. Make sure to have the whole object in frame and make sure the picture is taking up the entire screen. Below are some sample images (click to view in a New Window in your web browser).
Sample Image #1 - International Intermodal Container:
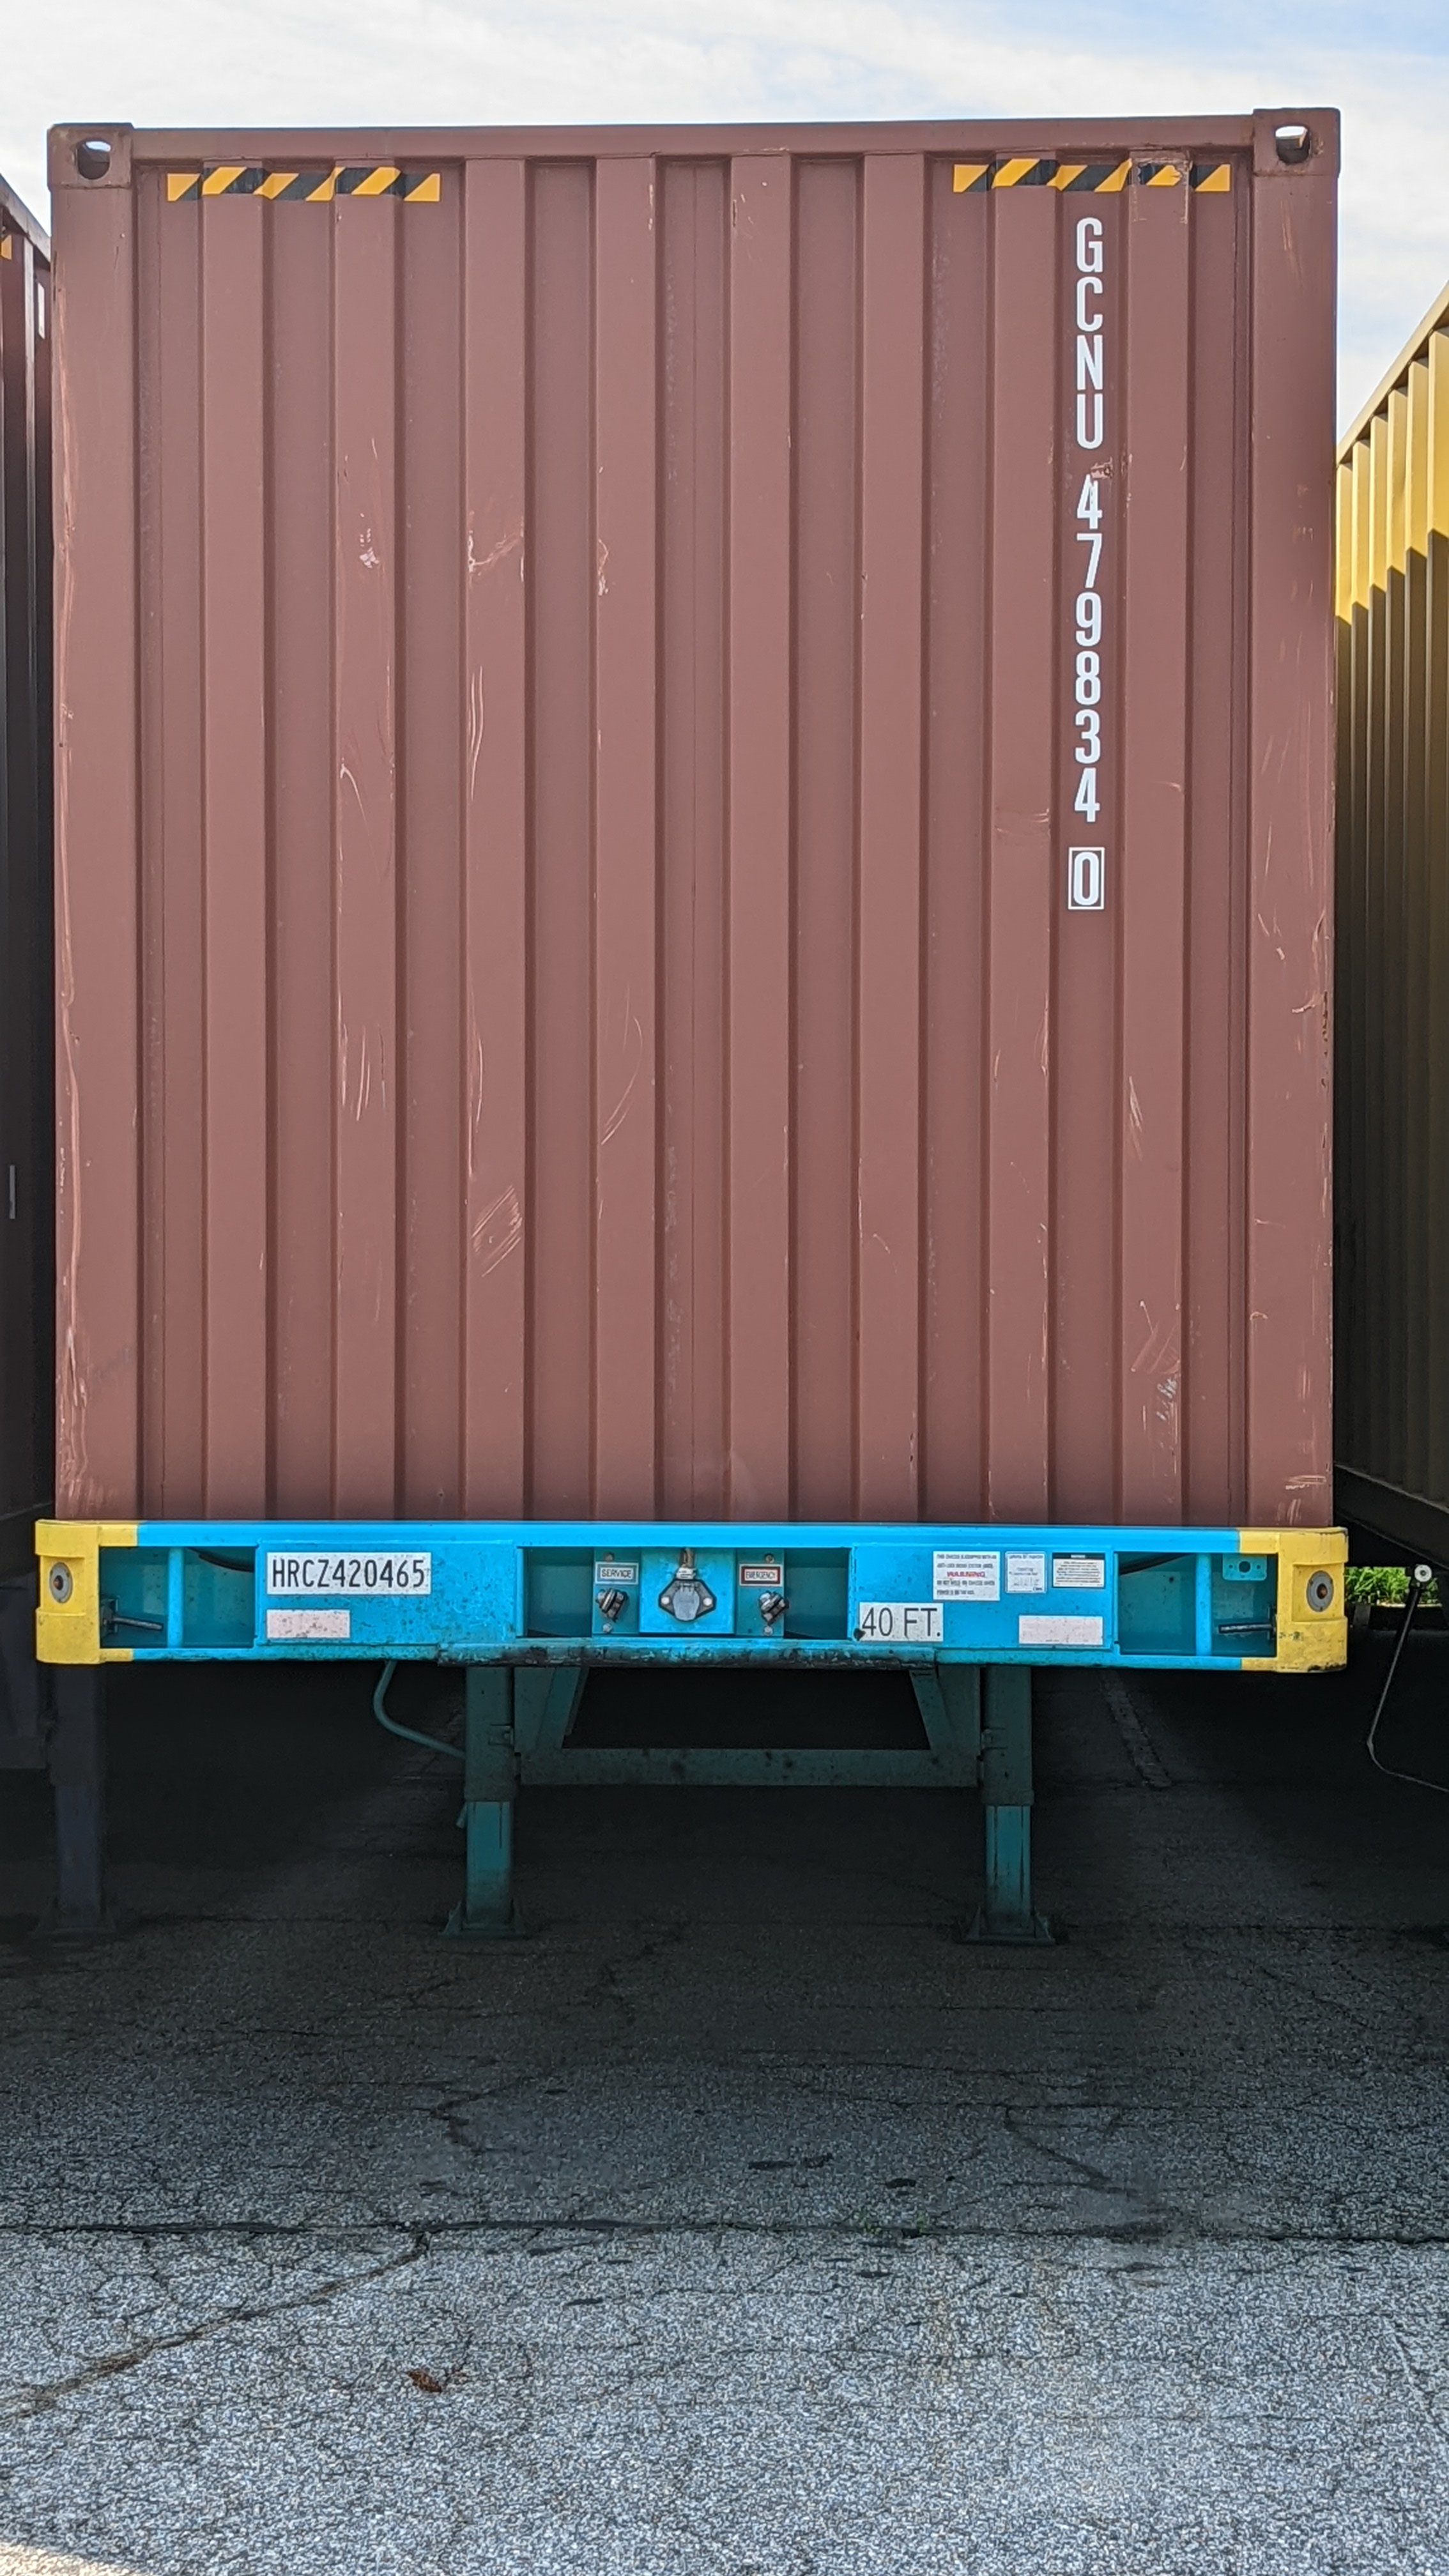

Sample Image #2 - Multiple International Intermodal Containers:
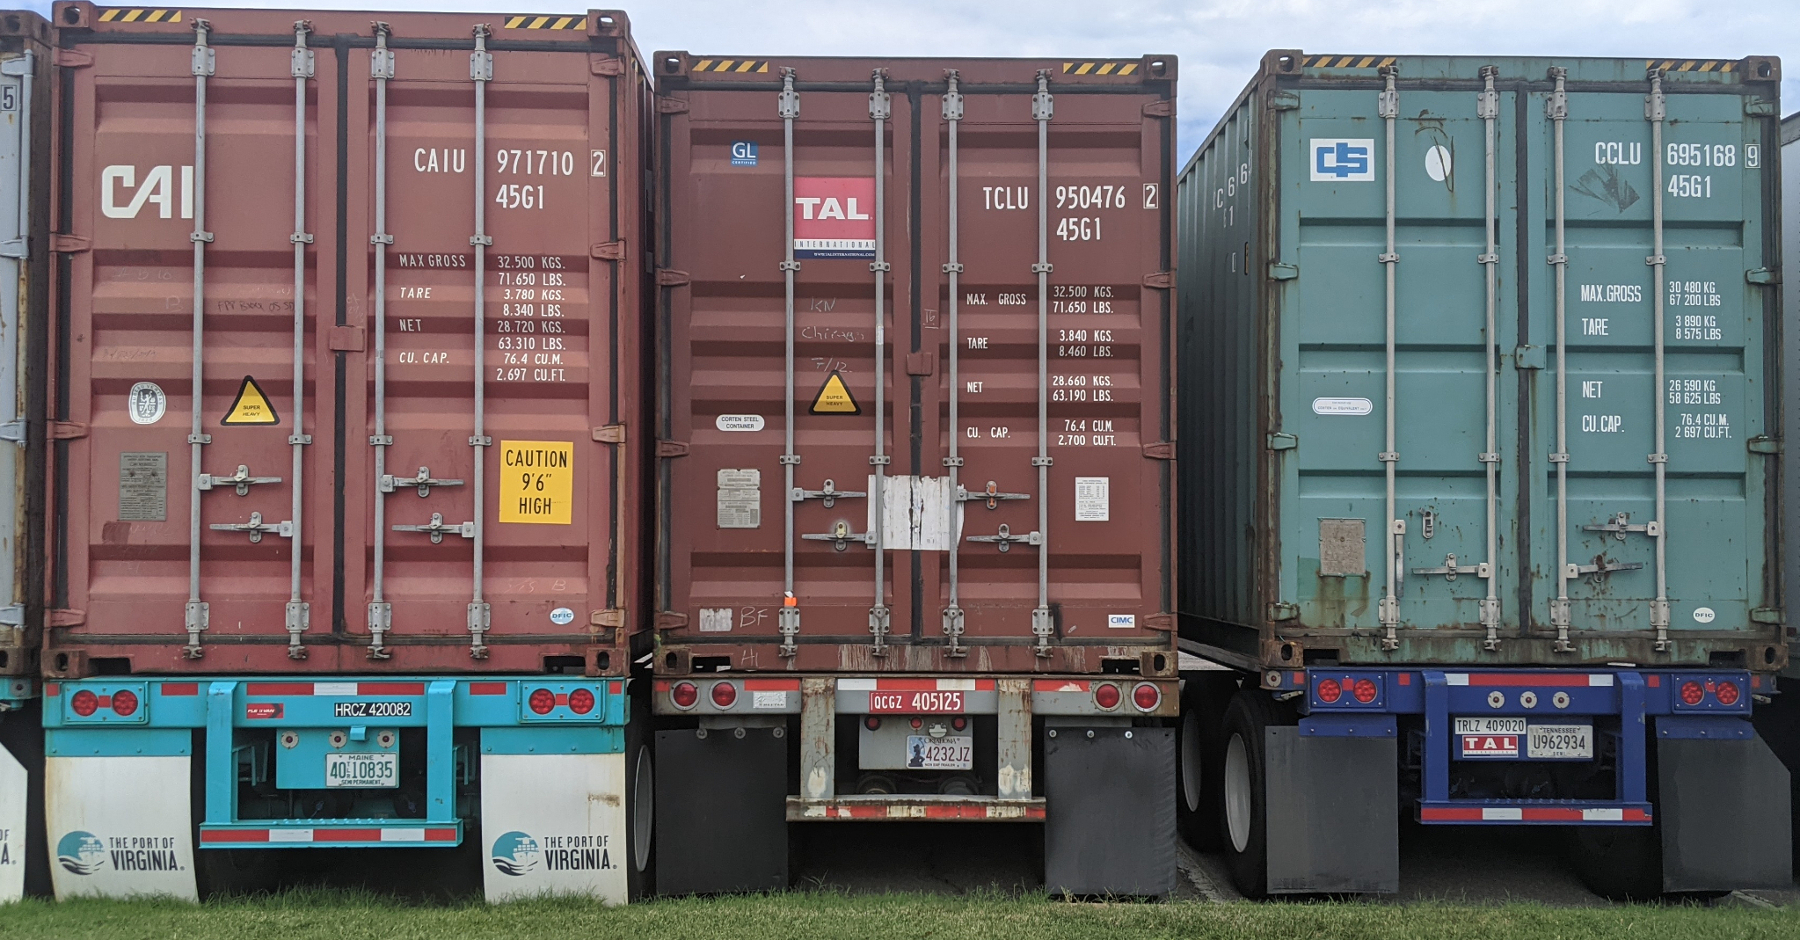
Use the images above in a full screen monitor to test scan with the Android app. The data should push to the spreadsheet that you set up to see the sample payload within a spreadsheet when you registered.
Reviewing the Data:
Please visit https://www.sitetrax.io and login to the SiteTrax.io Service Portal if you need to troubleshoot or monitor what you scanned (along with the results). A sample JSON payload is also available with each record in the SiteTrax.io Service Portal if needing to troubleshoot further.
NOTE: The default settings for free accounts is typically limited to 100 scans per month and scanning one asset (or image) at a time. If you wish to scan continuously with the app, please submit a support ticket at our support page.
Custom Endpoint: When you're ready to have live data pushed to your endpoint, please submit a support ticket at our support page and supply your registered username and project to request that the data is sent to your webhook destination.
Troubleshooting
If records from a video do not show up please check our status page or if all services are up then please submit a support ticket at our support page.
Test Development Environment - Setup SiteTrax.io Test API and JSON
The following article shows how to set up and configure a test environment to configure the SiteTrax.io API to push JSON messages to your REST API server via a webhook call (POST).
Prerequisites:
The following prerequisites are required in order to testing communication from SiteTrax.io REST API Client to your REST API server.
- SiteTrax.io Storage - For most accounts, SiteTrax.io uses Amazon S3 Buckets for storage. We recommend using your own buckets if you want to store your data long term. Provide us with the following information about your bucket so that we can configure the storage:
- Storage bucket name,
- region (default us-east-1),
- client key, and
- secret key
- REST API Server - REST API Server set up to receive messages. For example:
- Postman - www.postman.co
- Nightingale - www.nightingale.rest
- SiteTrax.io Router Configured - SiteTrax.io configured REST API router to send messages to the REST API Server above. This is done by the SiteTrax.io staff
- Sample Video Payload - Sample video payload to upload to storage.
- Bucket Browser Utility - upload into the notprocessed/ folder of the storage container (i.e. AWS S3 Bucket)
Configure Test REST API or JSON Message Trigger
The following steps define how to trigger a REST API message from the SiteTrax.io REST API Client to your REST API Server.
Step #1: Configure AWS Bucket to Receive Video Payload
You will receive AWS bucket credentials from Netarus. This includes a bucket name, region, client key and secret key. We recommend using a AWS bucket browser app (referenced above) to upload sample payload to your bucket.
Alternatively, you can download the SiteTrax.io Capture Android app here. This is configure easily using a predefined PIN.
Step #2: Configure your REST API Server (Webhook)
A REST API Server will need to be set up to receive JSON messages from SiteTrax.io in order to ingest the data. See our article on SiteTrax.io - Video (Input) REST API and JSON (Output) documentation.
Step #3: Provide REST API Endpoint URL
Once a REST API endpoint URL is provided we will be able to POST our JSON payload of the asset data to the REST API.
Step #4: Upload Video to Bucket to Trigger JSON Payload
You may use the bucket credentials provided or the SiteTrax.io Capture app to upload videos of assets to your bucket, after processing the videos the data will be POSTed to the REST API server.