Amazon Web Services
- SiteTrax.io API - Input (Video)
- Amazon Web Services: Camera Ingestion and Storage
- Test Development Environment - Setup SiteTrax.io Test API and JSON
SiteTrax.io API - Input (Video)
Getting Started
The SiteTrax.io backend requires a centralized data storage to transfer data to and from it. Currently, Amazon AWS S3 buckets are supported as the recommended data store. If needed, the bucket information and access keys can be provided by SiteTrax.io or your organization is welcome to set up their own S3 buckets. Please submit a support ticket to request a bucket and access keys to process videos.
For instructions on setting up a test environment, please see the Test Development Environment - Setup SiteTrax Test API and JSON article.
Overview
The SiteTrax.io backend analyzes video stored in an Amazon S3 bucket and outputs that data to any REST API server.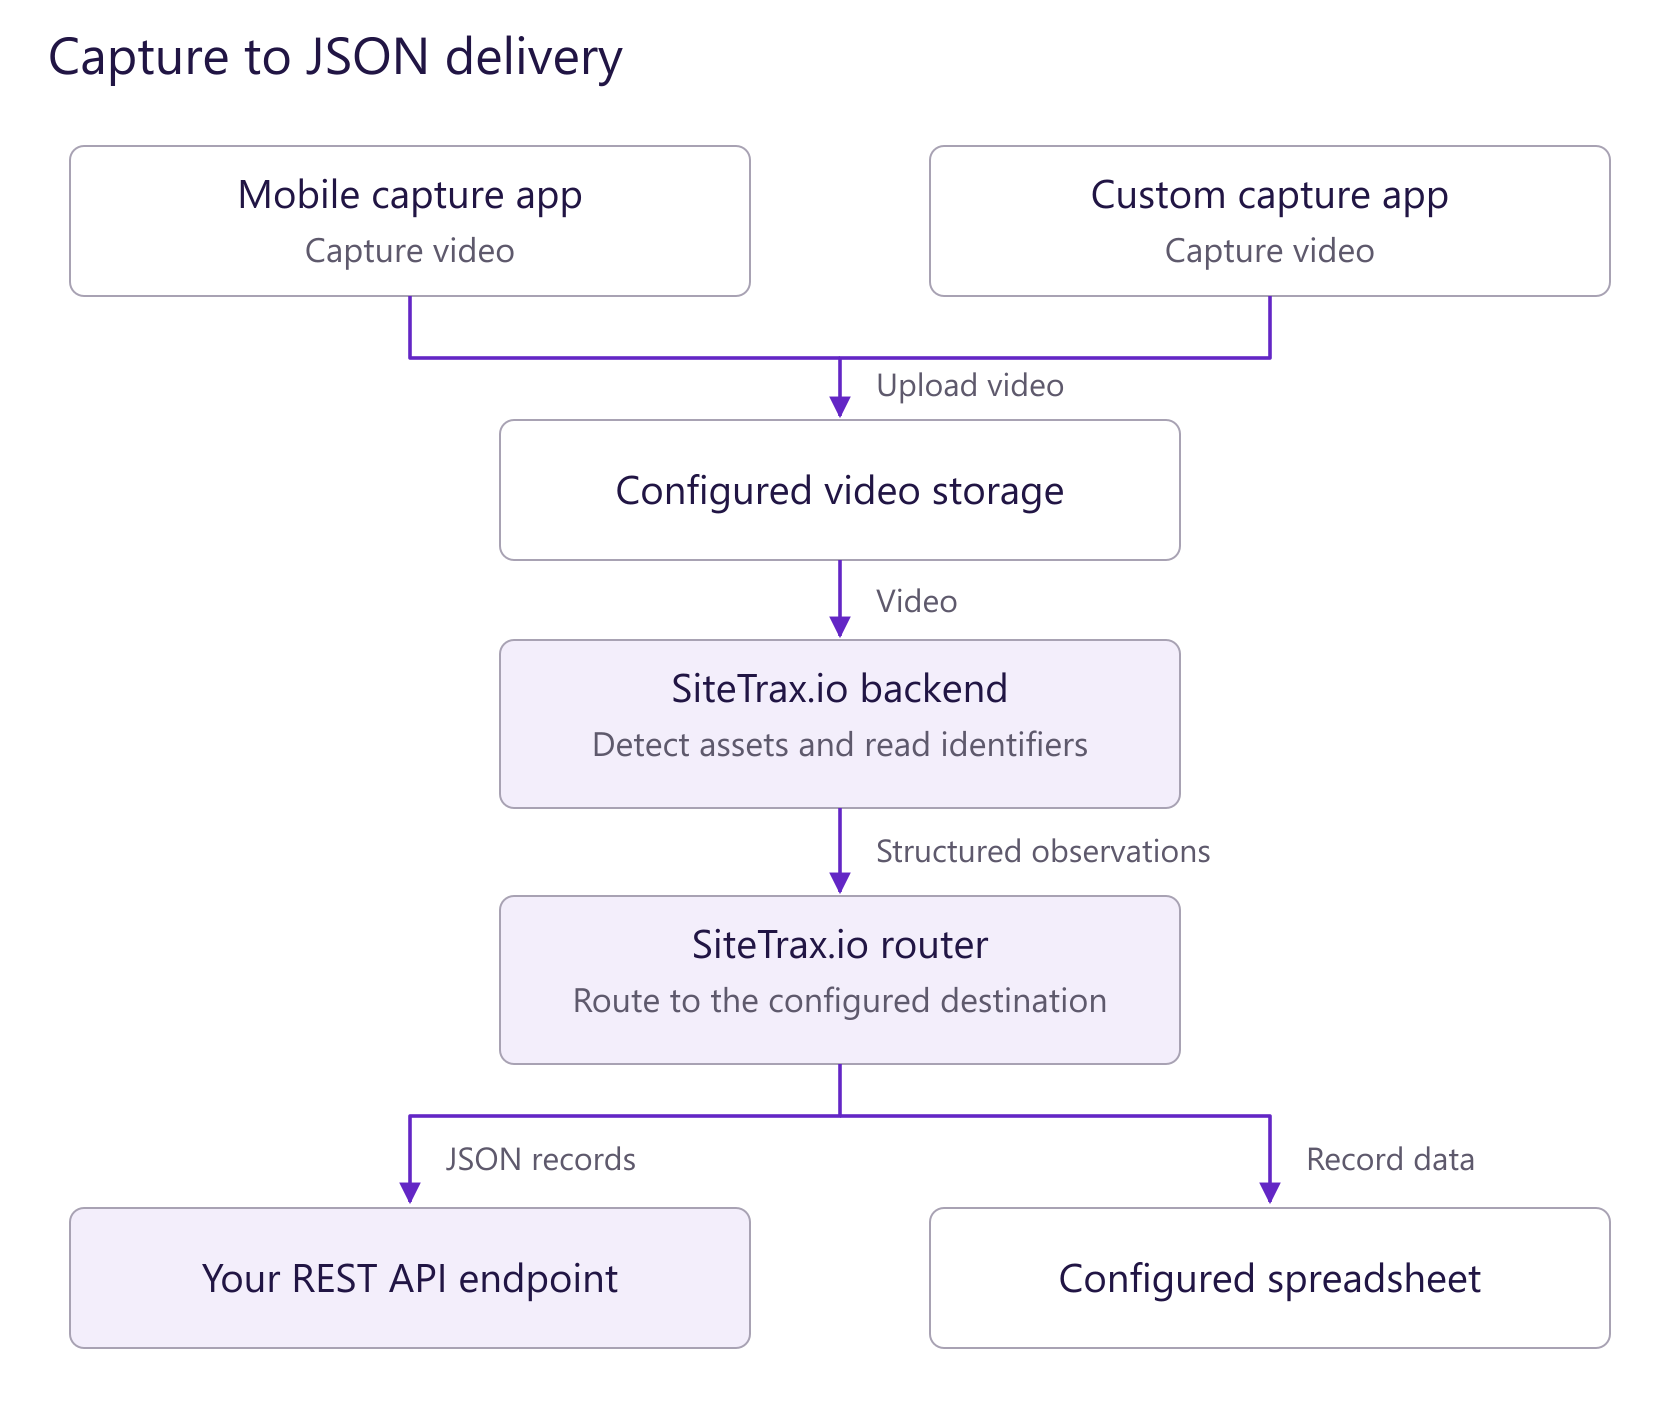
Open the capture-to-JSON flow at full size. In this provider setup, the configured video storage is an Amazon S3 bucket.
Step #1: Upload Video (Push) - See Input - Video Specifications below for more details
- Option #1: Using the SiteTrax.io Android app, capture video using any mode, which will upload capture and upload the video automatically for you into a storage bucket.
- Option #2: Upload video (no more than 1 minute in length) to the Amazon S3 bucket provided.
Step #2: REST API Server (Push)
After the video is uploaded in Step #1 above, the SiteTrax.io Backend will analyze the video and push the data analyzed to any REST API server via the SiteTrax.io Router. See Output - REST API page more information.
NOTE: Make sure to request API Server access via the link in the Overview section above.
Input - Video Specifications
The files that should be uploaded in {bucket_name}/notprocessed folder. The maximum recommended length of a video is 1 minute.
- Video length: If the video is more than 1 minute in length, it is recommended to split the video into multiple 1 minute videos.
- The recommended resolution of video is 1920x1080 with a frame rate of 30 frames per second.
- The lens of 6mm or longer should be used. A lens less than 5mm could cause distortion and the backend may not be able to read the OCR.
- The GPS information should be embedded in the subtitles of the video (this can be overwritten for static cameras)
SiteTrax.io Camera Types
SiteTrax.io can capture data from many different types of cameras including Android and basic security cameras. For implementation purposes, we recommend:
- SiteTrax.io Mobile app (i.e. Android) - Many cameras for one bucket. The GPS coordinates are dynamically sent base on the location of the mobile app.
- SiteTrax.io Gate or stationary camera - One camera to data store. The GPS coordinates have to be manually defined for each camera.
GPS Encoding
Below is an example of embedded subtitles in SRT format.
1
00:00:00,000 --> 00:00:00,150
36.8626459 -76.2314164

2
00:00:00,150 --> 00:00:00,300
36.8626459 -76.2314164

3
00:00:00,300 --> 00:00:00,450
36.8626459 -76.2314164
.
.
.
Video creation time should be present in both video stream and subtitle stream. In addition to this, creation time should also be present in file metadata. Video should be in mp4 format only. Below in an example of metadata as ffmpeg output.
Input #0, mov,mp4,m4a,3gp,3g2,mj2, from '2_20211018T042608717Z_s00.mp4':
  Metadata:
    major_brand     : isom
    minor_version   : 512
    compatible_brands: isomiso2avc1mp41
    creation_time   : 2021-10-18T16:26:08.000000Z
    encoder         : Lavf58.67.100
  Duration: 00:00:14.55, start: 0.000000, bitrate: 29921 kb/s
  Stream #0:0(eng): Video: h264 (Baseline) (avc1 / 0x31637661), yuvj420p(pc, smpte170m/bt470bg/smpte170m), 1920x1080, 33017 kb/s, SAR 1:1 DAR 16:9, 30.04 fps, 30 tbr, 90k tbn (default)
    Metadata:
      creation_time   : 2021-10-18T16:26:08.000000Z
      handler_name    : VideoHandle
      vendor_id       : [0][0][0][0]
    Side data:
      displaymatrix: rotation of -90.00 degrees
  Stream #0:1(und): Subtitle: mov_text (tx3g / 0x67337874), 1 kb/s (default)
    Metadata:
      creation_time   : 2021-10-18T16:26:08.000000Z
      handler_name    : SubtitleHandler
Sample videos can be found here.
Video Upload
Once a video is generated, it can be uploaded to your designated bucket. Your SiteTrax.io representative will give you a URL specific to your project. A POST request with the json body below (replace <video_name> with the file name of the video you are uploading) will return a presigned URL to which the video should be uploaded. This URL will be active for 300 seconds.
{
    "video": "<video_name.mp4>",
    "method": "put_object"
}
Once you have the presigned URL, uploading the video to the s3 bucket can be done by following these steps.
https://docs.aws.amazon.com/AmazonS3/latest/userguide/using-presigned-url.html
Note that this method can also be used to download a video that you have previously uploaded by changing the method to "get_object".
Once the video upload is complete, SiteTrax.io backend will start processing the video. The processing time is proportional to the number of trackable assets in the video.
If records from a video do not show up please check our status page or if all services are up then please file a support ticket at our support page.
Amazon Web Services: Camera Ingestion and Storage
This section describes the Amazon Web Services storage path documented for SiteTrax.io camera ingestion. Confirm the bucket, access method, retention and notification configuration for your deployment with SiteTrax.io before setup. Customer-owned storage does not imply that the entire SiteTrax.io application runs in the customer’s cloud account.
Amazon S3 storage ownership and retention
- Many third-party cameras support Amazon S3 as an upload destination.
- Decide whether you already have S3 buckets you prefer to use, or would rather use SiteTrax.io-managed storage.
- Align early on ownership, access, retention, and cost assumptions.
A note on data retention: When you use your own S3 buckets, you own the storage and therefore define your own data retention policy for raw video and interpreted images — keeping it as long or as short as your business and compliance needs require. You can manage this with S3 lifecycle rules; see Amazon's Managing the lifecycle of objects documentation. If you instead use SiteTrax.io-managed storage and need to keep raw video and interpreted images for longer than 90 days, SiteTrax.io recommends working with the team to store the data on a customer-provided solution such as Amazon AWS S3 — which is why customers who need longer retention typically bring their own S3 buckets.
For how video is ingested from S3, see SiteTrax.io API — Input (Video).
S3 Upload and Integration Requirements
For your BYOC deployment to work with SiteTrax.io Gate, your camera must deliver video into the SiteTrax.io processing pipeline through Amazon S3. SiteTrax.io analyzes the video stored in the S3 bucket, creates structured asset observations, and pushes the results to your REST API server and the SiteTrax.io Intelligence.
Setting Up the S3 Bucket and Upload Folder
Based on the documented ingestion flow, configure your storage as follows:
- Use a dedicated S3 bucket. You may use your own bucket or one provided by SiteTrax.io. For creating and configuring a bucket, see Amazon's Creating a bucket documentation.
- Upload videos to the
notprocessedfolder. Files should be uploaded to{bucket_name}/notprocessed. SiteTrax.io watches this folder and begins processing once an upload completes. - Upload using the presigned URL. Your SiteTrax.io representative will give you a project-specific URL. A POST request (with the video file name and
"method": "put_object") returns a presigned URL that is active for 300 seconds; upload the video to that URL. See Amazon's Using presigned URLs documentation for the upload mechanics. - Meet the video specifications. Keep each clip to about one minute, use 1920x1080 at 30 fps, a 6 mm or longer lens, and embed GPS in the subtitle stream (this can be fixed for static cameras). Full details are in SiteTrax.io API — Input (Video).
- Grant SiteTrax.io access. If you bring your own bucket, agree the required access method and permissions with SiteTrax.io. Request the deployment-specific setup procedure from your SiteTrax.io representative; do not paste access keys into assistant conversations.
Optional: Event Notifications
If your deployment uses event-driven notifications (for example, an Amazon SNS topic) to signal that a new object has been written to the bucket, the topic and its configuration values must be provided and confirmed by SiteTrax.io so they target the correct SiteTrax.io endpoint. For background on creating a topic, see Amazon's Creating an Amazon SNS topic documentation, then coordinate the specifics with SiteTrax.io as described below.
Obtaining the Bucket, Access, and Notification Details
To keep this infrastructure secure, the specific backend configuration values — including any notification topic details and the S3 access setup — are not published on this page. To obtain them and complete your configuration:
- Submit a support ticket via the SiteTrax.io support page, or contact your SiteTrax.io account representative, to request the S3 bucket, access keys, and any notification configuration for your deployment.
- The team will provide the project-specific upload URL and step-by-step setup instructions directly to you.
- Have your deployment information ready (site, intended S3 bucket, and camera details) so the team can scope the configuration to your environment.
If processed records do not appear after upload, check the SiteTrax.io status page; if all services are operational, submit a support ticket.
Test Development Environment - Setup SiteTrax.io Test API and JSON

The following article shows how to set up and configure a test environment to configure the SiteTrax.io API to push JSON messages to your REST API server via a webhook call (POST).
Prerequisites:
The following prerequisites are required in order to testing communication from SiteTrax.io REST API Client to your REST API server.
- SiteTrax.io Storage - For most accounts, SiteTrax.io uses Amazon S3 Buckets for storage. We recommend using your own buckets if you want to store your data long term. Provide us with the following information about your bucket so that we can configure the storage:
- Storage bucket name,
- region (default us-east-1),
- client key, and
- secret key
- REST API Server - REST API Server set up to receive messages. For example:
- Postman - www.postman.co
- Nightingale - www.nightingale.rest
- SiteTrax.io Router Configured - SiteTrax.io configured REST API router to send messages to the REST API Server above. This is done by the SiteTrax.io staff
- Sample Video Payload - Sample video payload to upload to storage.
- Bucket Browser Utility - upload into the notprocessed/ folder of the storage container (i.e. AWS S3 Bucket)
Configure Test REST API or JSON Message Trigger
The following steps define how to trigger a REST API message from the SiteTrax.io REST API Client to your REST API Server.
Step #1: Configure AWS Bucket to Receive Video Payload
You will receive AWS bucket credentials from Netarus. This includes a bucket name, region, client key and secret key. We recommend using a AWS bucket browser app (referenced above) to upload sample payload to your bucket.
Alternatively, you can download the SiteTrax.io Capture Android app here. This is configure easily using a predefined PIN.
Step #2: Configure your REST API Server (Webhook)
A REST API Server will need to be set up to receive JSON messages from SiteTrax.io in order to ingest the data. See our article on SiteTrax.io - Video (Input) REST API and JSON (Output) documentation.
Step #3: Provide REST API Endpoint URL
Once a REST API endpoint URL is provided we will be able to POST our JSON payload of the asset data to the REST API.
Step #4: Upload Video to Bucket to Trigger JSON Payload
You may use the bucket credentials provided or the SiteTrax.io Capture app to upload videos of assets to your bucket, after processing the videos the data will be POSTed to the REST API server.